Joomla Hosting BLOG

Blog about Joomla, Technologies and Hosting Service

Joomla Hosting - ASPHostPortal.com : Adding Javascript snippets to Joomla

clock October 29, 2015 00:19 by author ben

What is JavaScript?

JavaScript is a programming language used to make web pages interactive. It runs on your visitor's computer and doesn't require constant downloads from your website. JavaScript is often used to create polls and quizzes. JavaScript support is built right into all the major web browsers, including Internet Explorer, Firefox and Safari. Provided that the visitors to your site are using web browsers that support JavaScript (most do) and have JavaScript enabled (it is by default), then your JavaScript will run when they visit the page.

Module position basics

If you've been working with Joomla, you know that a Joomla template consists of HTML and some PHP snippets.

For one, it contains a component area where the output from the different components are shown (articles, blog lists, third-party components etc). A Joomla template also contains several PHP snippets, which are called module positions. You can assign modules to these positions and they will appear in the given position in your template.

Easier way to insert scripts

Of course, you can use an extension for each third-party script you want to enter. Probably there is one available (isn't there for almost anything?). The problem with this approach, though, is that you need to keep track of X number of extensions and their updates. And for each extension you add to your site, the chance of being hacked increases. After all, code is made by humans, and humans make mistakes.

For those reasons, I prefer using the 'Custom HTML' module when I need to insert code snippets. For best results, you should have special module positions for the JavaScript snippet modules. That way, you can control where in the source code the snippets appear, something which can be crucial for the workings of the snippet.

The method is simple, but effective.

You will need three module positions, and as many Custom HTML modules as you need (one for each snippet).

Inserting the module positions in your template

In order to make this as flexible as possible, you need three module positions:

  • endhead
  • topbody
  • endbody

Now you're ready to insert the module positions. You will need to enter the following code into your template index.php file. You'll find it here: /templates/yourtemplatename/index.php.

Make sure to create a backup of your index.php file before messing with it.

Enter this just before the </head> tag.

<jdoc:include type="modules" name="endhead" />

Enter this just after the <body> tag:

<jdoc:include type="modules" name="topbody" />

Enter this just before the </body> tag:

<jdoc:include type="modules" name="endbody" />

Save your template.

The next step is to add the actual modules that will hold your JavaScript. But before that, we need to do some adjustments to the text editor settings.

Allowing JavaScript in your editor

To be able to add the JavaScript to the Custom HTML module, you need to allow Javascript in your text editor. If you use TinyMCE, you find this setting in Extensions -> Plugin Manager -> Editor - TinyMCE 2.0. Make sure you have the setting for 'Code Cleanup on Startup' set to 'Off' and the 'Code Cleanup on Save' to 'Never'.

If you're using JCE, go to Groups -> Default (or other group you're using) -> Editor Parameters. Make sure the 'Allow Javascript' setting is set to 'Yes'.

Adding the script to the Custom HTML module

Now, you need to add the actual Javascript snippet to a Custom HTML module and assign it to the appropriate module position.

I'll use Google Analytics as an example. Go to the Module Manager and click New. Choose the 'Custom HTML' module type. You will see the module parameters.

Enter a title for the module, for instance 'Google Analytics code', enable the module, choose not to show the module title.

For the Google Analytics code, we assign the module to the newly created 'endhead' position. This has the Google Analytics snippet appear just before the closing HEAD tag (</head>). As you have not entered the new module positions to the template XML file, they will not appear in the module position drop-down. Not to worry: You can simply enter the position name 'endhead' in the field directly.

Lastly, enter the HTML mode of your editor and paste the Google Analytics code into the window. You can now save the module.

Best Joomla Hosting Recommendation

ASPHostPortal.com provides our customers with Plesk Panel, one of the most popular and stable control panels for Windows hosting, as free. You could also see the latest .NET framework, a crazy amount of functionality as well as Large disk space, bandwidth, MSSQL databases and more. All those give people the convenience to build up a powerful site in Windows server. We offers Joomla hosting starts from $5/month only. We also guarantees 30 days money back and guarantee 99.9% uptime. If you need a reliable affordable Joomla Hosting, we should be your best choice.


Joomla Hosting - ASPHostPortal.com : How to Customize Joomla CSS?

clock October 21, 2015 23:47 by author ben

How to Customize Joomla CSS?

CSS

  • CSS stands for Cascading Style Sheets
  • CSS describes how HTML elements are to be displayed on screen, paper, or in other media
  • CSS saves a lot of work. It can control the layout of multiple Web pages all at once
  • External Style Sheets are stored in CSS files

CSS in Joomla Template

Some templates use only one CSS file (called template.css, mostly), others have several. For optimal page performance, you should keep the number of CSS files to a minimum. This reduces the number of server requests necessary to show the page. You may sometimes see that the template uses a main CSS file which imports all of the other files by the following syntax (example):

@import url('reset.css');
@import url('joomla.css');
@import url('typography.css');
@import url('modules.css');
@import url('custom.css');

Don't repeat styles if you don't need to

When styling elements with CSS it's important to be specific. And to keep your stylesheet lean. What I mean is you don't need to repeat styling just because you want to restyle an element. Let's say, for instance, that you have the following style for the H1 tag in your main CSS file (template.css or similar):

h1 {
font-size:24px;
color:#d7d7d7;
margin-bottom:1em;
text-transform:uppercase;
}

The normal styling for H tags are bold. Maybe you want to add the styling to make the header tag use the normal and not the bold style of the font. And, at the same time you don't want to have uppercase letters in the H1. Of course, you could do it like this, adding the following code to your custom.css:

h1 {
font-size:24px;
color:#d7d7d7;
margin-bottom:1em;
text-transform:none;
font-weight:normal;
}

This works, but it's not good code. You repeat all of the styling even though you just want to alter one style and add another. This is a better way:

h1 {
text-transform:none;
font-weight:normal;
}

In this case, you only add the styles that are different from the original. The other styles are left untouched.

Use Firebug to Test Your CSS

One of the tools I use to test my CSS is called Firebug. It's an add-on to Chrome which gives you a lot of information about the CSS and HTML structure of a web page. When you have Firebug installed, you can right-click on an element and choose 'Inspect element'. The Firebug window will open at the bottom of the screen. Now, you can see the HTML structure (left) and the CSS (right).

Now the fun begins! You can start experimenting with the CSS directly in Firebug. Want to change the margin of an element? The background color? Remove the border? Every tweak you would like is available to play with, and the result is instantly shown in the browser. Of course, if you refresh the page the changes are lost. When you're happy with your changes, copy the CSS into your custom CSS file and upload to your server.

You can also use the Inspector or Firebug Lite in Google Chrome or Safari.

Take a look at my previous post about 8 Free Firefox extensions every Joomla user should have.

Take some time to learn CSS

I believe every Joomla user / web site developer should learn some CSS and know HTML by heart. It makes it so much easier to modify your templates and to achieve what you (and your client?) wants.

It's not like learning PHP. I hardly know more than a handful things about PHP. HTML and CSS, however, are like second nature to me. That's because I've invested time into learning and practicing the use of these skills. This is especially true for CSS.

Easy to get started with CSS and Joomla

The easiest way of starting to learn CSS is to look at your existing template.css. Look at the structure of it and try changing some of the styles. Do a backup of the file first.

You could try and change the header tags first. Want the H2 tag to be smaller? You got it :) And now it's a site-wide change, valid for all instances of the H2 tag. Other tags to change are the a (link) tag, the p (for instance adjusting the line spacing) and the UL and LI tags (bullet list).

Best Joomla Hosting Recommendation

ASPHostPortal.com provides our customers with Plesk Panel, one of the most popular and stable control panels for Windows hosting, as free. You could also see the latest .NET framework, a crazy amount of functionality as well as Large disk space, bandwidth, MSSQL databases and more. All those give people the convenience to build up a powerful site in Windows server. We offers Joomla hosting starts from $5/month only. We also guarantees 30 days money back and guarantee 99.9% uptime. If you need a reliable affordable Joomla Hosting, we should be your best choice.


Joomla 3.4 Hosting :: ASPHostPortal.com - How to find JavaScript conflict in Joomla

clock November 20, 2014 05:39 by author ben

How to find JavaScript conflict in Joomla?

While JavaScript are beautiful and very handy, they can also bring down a site if in conflict with each other. One can expect JavaScript conflicts to appear as more and more extensions are installed in a Joomla site. The extensions may be using different JavaScript libraries or different library versions or libraries made by different developers which can be in conflict to each other.
It is not all that difficult to rule out such conflicts and extension / template developers can be asked for help then on.

What causes JavaScript conflicts?

The different versions of Mootools library and jQuery library can make a lot of JavaScript conflicts. Event when you use the same libraries versions but those libraries made by different developers (i.e jQuery and Mootools conflict), JavaScript conflict can also occur.

Here is a case study:

  • Template A loads Mootools library version 1.5.0
  • Plugin B loads own Mootools library version 1.2.6
  • Module C loads jQuery library version 1.11
  • Component D loads jQuery library version 2.1.1

An other cause of JavaScript conflict is browser, some non-standard browsers handle JavaScript and the browser's JavaScript conflicts with JavaScript loaded from your site.

How to detect JavaScript conflicts?

So when your site is not working as expected, one should rule out conflicts. But how to check and find the JavaScript conflict?

"The ANSWER is checking the JavaScript console".

There are multiple ways to do it based on browsers. For example, in Firefox and Chrome, the available tools are Firebug, Web Developer toolbar, Debugger, Error Console, etc.
If your site has JavaScript error, the tools will provide you error messages that will help you to figure out the problem and zero in on the extension / feature of website causing this problem. The error message also gets you the names of file in conflicts.

You can detect the problem by checking which extensions cause the problem, here are the steps:

  • Switching to default Joomla template and disable your installed extensions then reload your site and check if the JavaScript error still exist or not.
  • Publish your installed extensions one by one and reload your site. Repeat the process until you discover which parts are in conflict.

How to resolve JavaScript conflicts?

There is no universal step to resolve JavaScript conflict as it varies from case to case and are best resolved by the developers. But here are few things that you can try:

  • Put jQuerry into no-conflict mode

The jQuery library and all of its plugins are contained within the jQuery namespace. Global objects are stored inside the jQuery namespace, by the way so you shouldn't get a clash between jQuery and any other library such as prototype.js, MooTools.

  • Putting jQuery in no-conflict mode immediately after it is loaded onto the page and before you attempt to use jQuery in the page.

<!-- Another way to put jQuery into no-conflict mode. -->
<script src="/prototype.js"></script>
<script src="/jquery.js"></script>
<script>
jQuery.noConflict();
jQuery( document ).ready(function( $ ) {
    // You can use the locally-scoped $ in here as an alias to jQuery.
    $( "div" ).hide();
});
// The $ variable in the global scope has the prototype.js meaning.
window.onload = function(){
    var mainDiv = $( "main" );
}
</script>

Ask for help from extension provider

If you can not resolve the JavaScript conflict by yourselves, you can search for solutions on internet, ask on forums or ask for support of the extension provider for solution.

My site has different issues?

JavaScript conflict is just one error type, errors can also be produced by PHP, SQL, etc. You can detect those errors using Joomla error reporting, follow THIS LINK for more details.


Joomla 3.3 Hosting - ASPHostPortal.com :: How to Improve your Joomla Speed

clock November 10, 2014 08:22 by author ben

How to Optimize Joomla 3 to Improve Site Performance

We know that speed is amongst the most important factors for the success of your website. By default, Joomla isn't slow but you can do a lot to optimize it and achieve great speed for your site. Here you will find the most essential actions you can take to speed up your Joomla 3 website. Here are few things you can easily do to speed-up Joomla:

Keep Joomla and its Extensions Updated

Having the latest version of Joomla is important for your site speed because in each version there are multiple code improvements. Even if the changes are small - new Joomla versions are generally performing better than previous ones. For more information on how to update Joomla to the latest version check out our Joomla Update Tutorial.

Keeping your Joomla extensions up-to-date is as important for the speed of your website as the Joomla itself. For more information on how to keep your Joomla 3 components, modules and plugins up-to-date, please refer to our tutorial on How to Upgrade Joomla.

Enable Joomla Caching

If cache is not enabled, every time your visitors load one of your pages, Joomla has to do few things - fetch the content from its database, load all the plugins, components and modules, you have installed, load your template file and combine all that into a single page. Needless to say this process takes time. This is where the internal Joomla caching system comes to help. When you enable the cache, the first time someone loads your page, the result from the above mentioned actions is stored. Then, all the following visitors will directly get the stored version of that page as if it was a simple, plain HTML file which is much, much lighter and loads faster. This is why caching is one of the most important things to enable in order to have a fast Joomla site.

To enable the Joomla caching, first go to System -> Global Configuration.
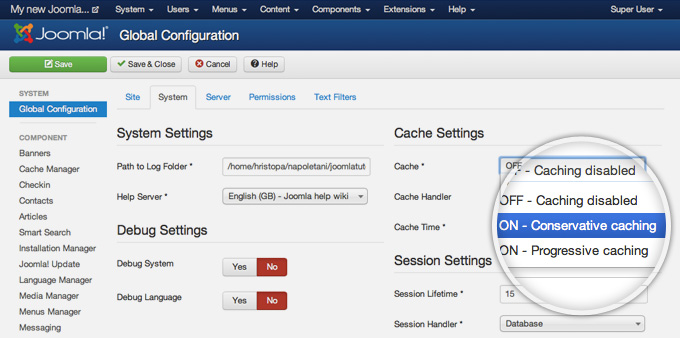
Next, you need to click on the System tab to get to the caching settings.
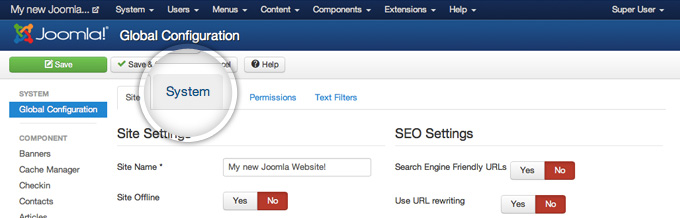
 

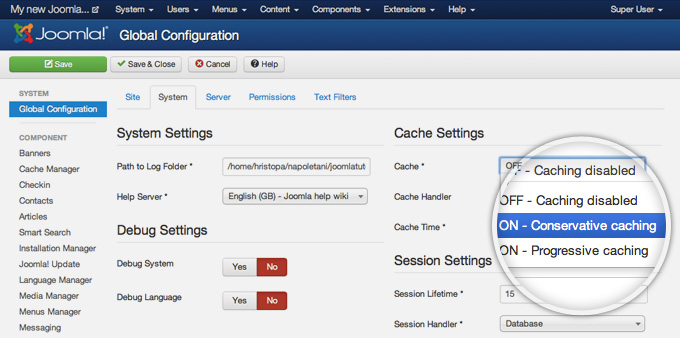
On the right part of this page you will find the Cache Settings. Find the Cache label and click on the drop-down next to it. From the list, please select the ON - Conservative caching option. The other available option - Progressive Caching works a bit different - it stores cached version of your site per each one of your visitors. It is useful in some particular cases and we don't recommend you to use it unless you're absolutely sure you need such caching enabled.
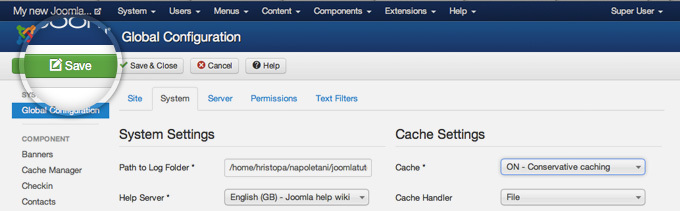
Once you set the caching to Conservative Caching, click on the green Save button at top of your page.
There is one final step that you need to make before the Joomla caching system actually starts working - to enable the System - Cache core Joomla 3 plugin. To do this go to Extensions -> Plugin Manager.
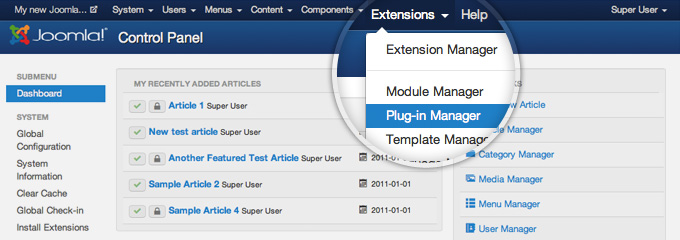
Here you will see a big list of all the plugins, currently installed in your Joomla application. The easiest way to locate the caching plugin is to use the search field. Just type in cache and press the magnifying glass button next to the search field.
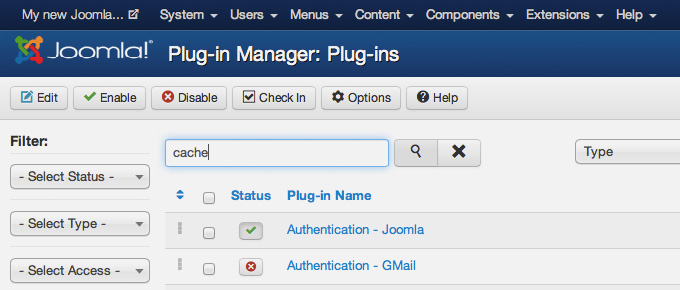
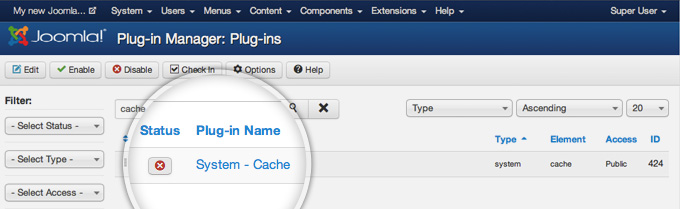
Once you do that, you will see the System - Cache plugin and a red cross button next to it indicating that the plugin is disabled. To change its status to enabled press on the red button.
Finally, the status button next to the caching plugin will turn green and you'll see a message, indicating that the plugin has been enabled successfully.
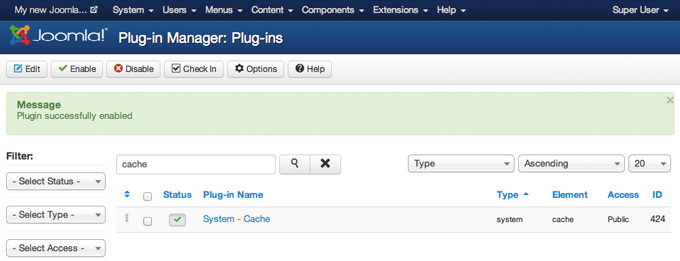
That's it! Your Joomla caching system is now enabled and functional!

Enable Joomla Compression

Another thing that will greatly improve the performance of your Joomla website is the compression. If you enable the internal Joomla compressions system, the page that your visitors will download will be compressed before it is transferred to them. When your webpage size is reduced through compression, it will load much faster. To enable the Joomla compression, first access your admin area and go to System -> Global Configuration.
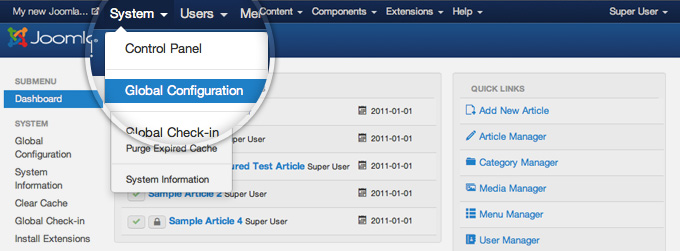
On this page you will see numerous settings. Click on the Server tab to view the server-related options you can change.
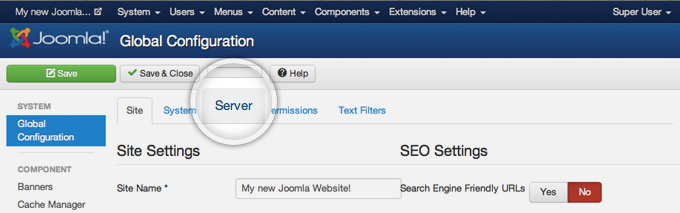
Here, locate the Gzip Page Compression label and press the Yes button next to it to enable the Gzip compression for Joomla.
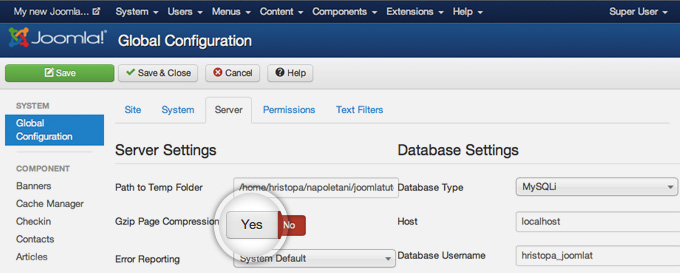
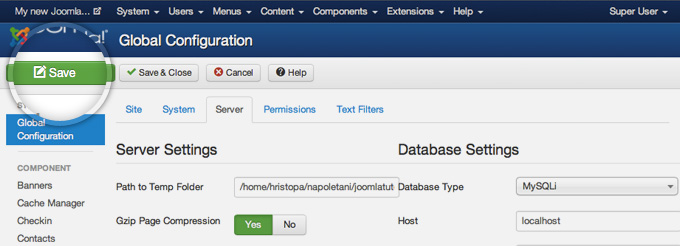
You will notice that the indicator will turn green showing that the compression is enabled. Finally, press the green Save button in the top left part of the page to commit your changes.
That's it, the compression of your Joomla 3 site is enabled. You can use one of the many free online tools for testing the Gzip compression such as http://checkgzipcompression.com for example. If everything is alright, you should see a notification that the compression is enabled successfully as well as some information about the change in size of your pages. As you can see from the screenshot below, we've reduced the size of our sample page three times simply by enabling the compression.
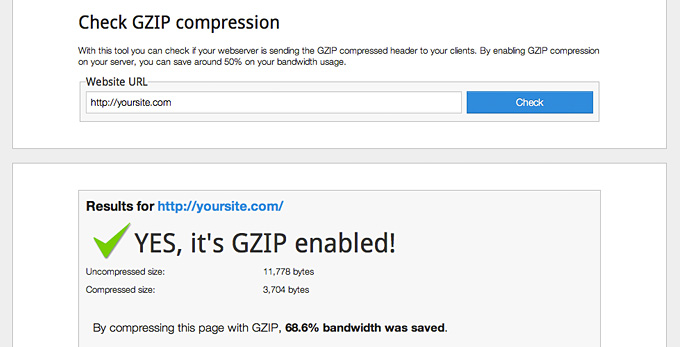
Warning In same cases enabling the Gzip compression may cause errors. The most probable reason for such errors is that Gzip is either not installed or not configured correctly on your server. Please contact the support team of your hosting provider for further assistance.

Add .htaccess Optimization Rules

Htaccess files handles the way your webservers process your site. There are few rules you can add at the end of the .htaccess file that will improve the performance of your Joomla site:

  • ETag - tells browsers when one image has already been downloaded and can be fetched from the local browser cache instead from the server
  • Expires headers - similar to ETag but allows you to set different expiration times for different file type
  • AddOutputFilterByType DEFLATE - minifies the source code of your compiled HTML files by removing empty lines, breaks and spaces

########## Begin - ETag Optimization
## This rule will create an ETag for files based only on the modification
## timestamp and their size.
## Note: It may cause problems on your server and you may need to remove it FileETag MTime Size
# AddOutputFilterByType is now deprecated by Apache. Use mod_filter in the future.
AddOutputFilterByType DEFLATE text/plain text/html text/xml text/css application/xml application/xhtml+xml application/rss+xml application/javascript application/x-javascript
# Enable expiration control
ExpiresActive On
# Default expiration: 1 hour after request
ExpiresDefault "now plus 1 hour"
# CSS and JS expiration: 1 week after request
ExpiresByType text/css "now plus 1 week"
ExpiresByType application/javascript "now plus 1 week"
ExpiresByType application/x-javascript "now plus 1 week"
# Image files expiration: 1 month after request
ExpiresByType image/bmp "now plus 1 month"
ExpiresByType image/gif "now plus 1 month"
ExpiresByType image/jpeg "now plus 1 month"
ExpiresByType image/jp2 "now plus 1 month"
ExpiresByType image/pipeg "now plus 1 month"
ExpiresByType image/png "now plus 1 month"
ExpiresByType image/svg+xml "now plus 1 month"
ExpiresByType image/tiff "now plus 1 month"
ExpiresByType image/vnd.microsoft.icon "now plus 1 month"
ExpiresByType image/x-icon "now plus 1 month"
ExpiresByType image/ico "now plus 1 month"
ExpiresByType image/icon "now plus 1 month"
ExpiresByType text/ico "now plus 1 month"
ExpiresByType application/ico "now plus 1 month"
ExpiresByType image/vnd.wap.wbmp "now plus 1 month"
ExpiresByType application/vnd.wap.wbxml "now plus 1 month"
ExpiresByType application/smil "now plus 1 month"
# Audio files expiration: 1 month after request
ExpiresByType audio/basic "now plus 1 month"
ExpiresByType audio/mid "now plus 1 month"
ExpiresByType audio/midi "now plus 1 month"
ExpiresByType audio/mpeg "now plus 1 month"
ExpiresByType audio/x-aiff "now plus 1 month"
ExpiresByType audio/x-mpegurl "now plus 1 month"
ExpiresByType audio/x-pn-realaudio "now plus 1 month"
ExpiresByType audio/x-wav "now plus 1 month"
# Movie files expiration: 1 month after request
ExpiresByType application/x-shockwave-flash "now plus 1 month"
ExpiresByType x-world/x-vrml "now plus 1 month"
ExpiresByType video/x-msvideo "now plus 1 month"
ExpiresByType video/mpeg "now plus 1 month"
ExpiresByType video/mp4 "now plus 1 month"
ExpiresByType video/quicktime "now plus 1 month"
ExpiresByType video/x-la-asf "now plus 1 month"
ExpiresByType video/x-ms-asf "now plus 1 month"

Reduce Your Images Size

Images are big part of your website. In most of the cases images can be optimized. There are several tips that you should follow when you use images in your pages:

Never use large photos and then scale them using HTML - it takes the browser time to scale the images and they look worse than the original. Always optimize your images. Applications like Adobe Photoshop and online services like  Smush it for example offer easy to use tools that will reduce the size of your images without lowering their quality greatly. Don't add too many images to a single page. If you have an article with many photos for example, try splitting it into pages.

Remove unused and unoptimized extensions

Each Joomla extension you add to your website requires system resources, database and disk space to operate. Having many extensions will increase the overa ll size of your website and make it slower. This is why, it is important to make sure that you have only extensions that you're actually using installed on your Joomla site. People often test different plugins, component and modules and forget to remove them once they finish working with them. It's great idea to do a clean-up of such extensions once in a while just to make sure there isn't any unnecessary content added to your site. Last but not least, when you choose the best extensions for the functionality you want to add to your Joomla site, always check for user reviews regarding the load it creates. Some components are poorly written and can affect the performance of your entire site.

Use Optimization Extensions

There are many extensions that try to improve the performance of your Joomla website. During the years of experience we've gathered while working with Joomla sites, there are few that we can recommend:

  • JCH Optimize - Combines JavaScript & CSS, combines images into sprites, minifies and compresses JavaScript
  • Jbetolo - All the functionality that JCH Optimize has plus CDN support
  • JotCache- Improves the built-in Joomla caching system
  • Cache Cleaner- easily clean the cache from the Joomla admin panel


About ASPHostPortal.com

We’re a company that works differently to most. Value is what we output and help our customers achieve, not how much money we put in the bank. It’s not because we are altruistic. It’s based on an even simpler principle. "Do good things, and good things will come to you".

Success for us is something that is continually experienced, not something that is reached. For us it is all about the experience – more than the journey. Life is a continual experience. We see the Internet as being an incredible amplifier to the experience of life for all of us. It can help humanity come together to explode in knowledge exploration and discussion. It is continual enlightenment of new ideas, experiences, and passions

 photo ahp banner aspnet-01_zps87l92lcl.png

Corporate Address (Location)

ASPHostPortal
170 W 56th Street, Suite 121
New York, NY 10019
United States

Sign in